
In the post Hide Docker containers behind a Docker VPN I described how to set up an isolated Docker network to house and add authentication to Docker containers that comes without it. As far as authentication goes, it’s secure from between your machine to the subnet where the VPN and other containers reside.
However, we were only able to access containers within the VPN using their IPs because no external DNS service has knowledge of what is inside the VPN. This is counter-intuitive and troublesome for us who’ve grown used to accessing websites by their fully qualified domain names. Therefore this time I am introducing how to host a domain name service (DNS) inside the VPN to provide name resolution automatically when new containers are started.
Before showing you how it’s done, though, I should go through how this DNS-based approach compares to it’s alternative, a Nginx reverse proxy with HTTPS inside the VPN.
Why a domain name server? Why not a Nginx reverse proxy?
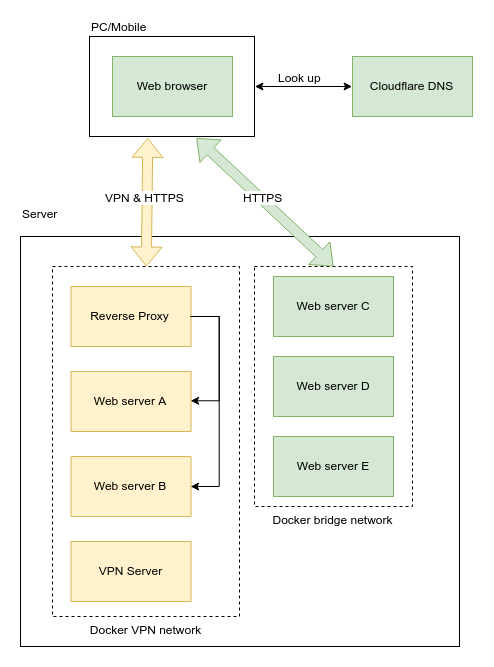
You may ask — why a DNS? You could have used a Nginx reverse proxy to redirect traffic by the domain names requested, and then point the domains you want to use for internal containers at the Nginx reverse proxy in a publicly accessible DNS. Even though visitors can see the IP of your Nginx server, they can only access the Nginx server when connected to the VPN — which you are supposed to be the only person having access.
You may even get HTTPS working this way by passing the DNS challenge, or provision a separate server just to pass the HTTP challenge, and then change the DNS entry to point to your real, internal container.
People are lazy — I am lazy.
Frankly speaking using a Nginx reverse proxy is probably the most proper way to do it because one gets the security benefit from both VPN and HTTPS. However, I was lazy and I’d rather sacrifice the security within my VPN as I am the only one using it. However if you share access to the VPN with somebody else, I’ll strongly recommand using HTTPS even inside the VPN.
But if it’s only you, then security inside the VPN network isn’t that important, even if credentials may be logged and escape the containment of the VPN via external log aggregation services/docker volume.
Server setup
- A Linode instance with 1GB RAM
- Ubuntu 18.04
- Docker 18.06.1-ce
- Docker image
- VPN: hwdsl2/ipsec-vpn-server
- DNS: defreitas/dns-proxy-server
- Web service: nginx:1.13.8-alpine
How it works?
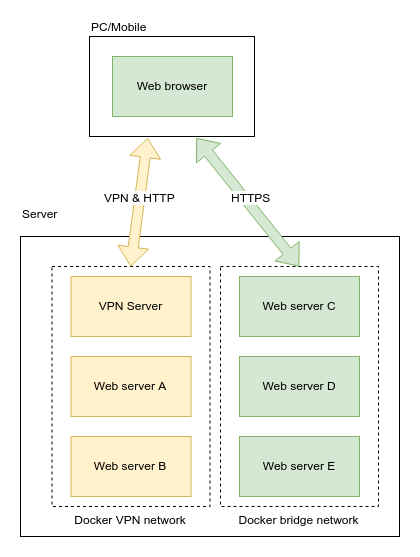
Assuming you’ve read and followed the last post, you should already be having a setup that reassembles this.
Our goal is add an DNS to the VPN that can resolve hostnames of services within the VPN, and be able to automatically add/remove DNS entries as the containers start/stop. VPN user should use this internal DNS as the primary DNS, and external DNS such as 1.1.1.1 or 8.8.8.8 for secondary and tertiary DNS.
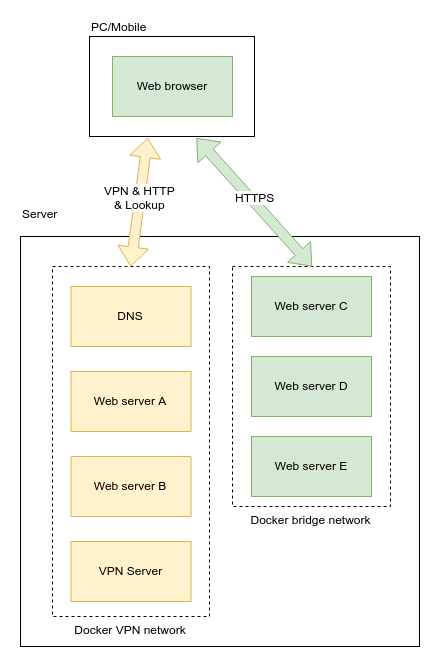
Creating the internal DNS
Assuming there exists a Docker bridge network 172.20.0.0/16 called
vpn, let’s start a container with a fixed IP 172.20.0.4. We will
use this DNS to resolve hostnames of containers inside the VPN.
docker run --name dns \
  --restart=always \
  --net vpn \
  -v /var/run/docker.sock:/var/run/docker.sock \
  -v /etc/resolv.conf:/etc/resolv.conf \
  --hostname dns.lan \
  --ip 172.20.0.4 \
  -d defreitas/dns-proxy-server
One good thing about this DNS is there’s nothing we need to do except spinning it up. The service will listen to start/stop of containers and reconfigure itself to resolve hostnames of those services.
Configure the VPN to use internal DNS
Recall the vpn.env file in the previous post. We added some
environmental variables to configure the VPN.
# vpn.env
VPN_IPSEC_PSK=your_ipsec_pre_shared_key
VPN_USER=your_vpn_username
VPN_PASSWORD=your_vpn_password
Now with the new VPN, we should configure the VPN such that it uses the internal DNS instead of the system’s default DNS for domain name resolution.
# vpn.env
VPN_IPSEC_PSK=your_ipsec_pre_shared_key
VPN_USER=your_vpn_username
VPN_PASSWORD=your_vpn_password

VPN_DNS_SRV1=172.20.0.4
VPN_DNS_SRV2=1.1.1.1
Let’s recreate the container.
docker stop ipsec-vpn-server
docker rm ipsec-vpn-server

docker run \
    --name ipsec-vpn-server \
    --env-file ./vpn.env \
    --restart=always \
    --network vpn \
    -p 500:500/udp \
    -p 4500:4500/udp \
    -v /lib/modules:/lib/modules:ro \
    -d --privileged \
    hwdsl2/ipsec-vpn-server
Give our web service a hostname
Our lizard people site from last time needs to be recreated to add a hostname to it. This time, no IP is specified because once we resolve hostname through the DNS, what IP the container has doesn’t matter anymore.
docker stop test-web
docker rm test-web

docker run \
    --name test-web \
    -v `pwd`:/usr/share/nginx/html:ro \
    --network vpn \
    --hostname test.lan \
    --restart=always \
    -d nginx:1.13.8-alpine
Accessing the web service using hostname
You can refer to this guide for connecting to the VPN from your PC or mobile device.
On Android you can select to use 172.20.0.4 as your DNS.
Even if you don’t, the VPN itself will use our internal
DNS service as the primary DNS.
After connecting to the VPN and navigating to http://test.lan,
the IP to the web server will be resolved through the
internal DNS.

As I said earlier, with this approach you can only access the containers using HTTP. You could go the extra mile to get a self-signed cert or spoofing Let’s encrypt in HTTP/DNS challenge to get a legitimate cert. I have never tried that before, so there’s no guarantee that it works.
Even though the browser is talking to the web server by HTTP, the traffic is actually tunneled through VPN and thus it’s safe from sniffing between my PC and the server. The traffic goes out from the VPN server to containers in the same subnet, meaning the traffic never needed to leave the machine hosting these services. In my book, this is safe enough for the convenience.
How do I remember all the hostnames and port numbers?
One thing that happened to me was that many services tend to use ports other than 80 port. The most famous are 3000 and 8080, and there are some more magic numbers the service’s developer decided to listen on.
Even though I can remember, say, the hostname vcs.lan for
my Git server, it is difficult for me to remember the port number
6003.
On an VPN+DNS setup one possible way to solve this is to run
and internal link shortener service. For example, you can go to
a site by navigating to g/vcs that redirects you to the
version control site inside the network vcs.lan:6003, in which
g is the hostname of your link shortener service.
In fact, you can run this whole thing off a single, static HTML file given that your mapping rarely changes. Alternatively, you can run a small link shortener service others have made.
Me? I use tommyku/golk which as of writing is still in its infancy. Well, it gets the job done so why not?