
This is the part 2 of a 2-part tutorial about jump-starting a Laravel project on Openshift. go to part1
The frontend
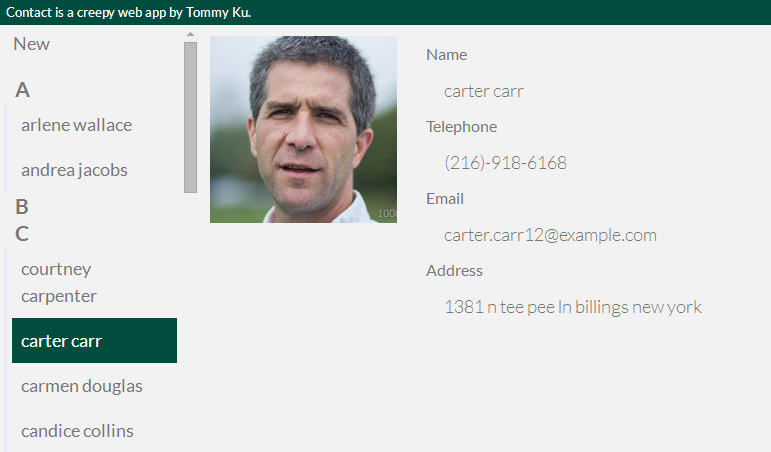
This tutorial focuses on the backend using Laravel, so I will save the trouble going through the source code of the frontend. It is built on AngularJS with a little CSS to improve the aesthetics. Just grab the source from Github.
The API
Security aside, the application consists of 4 available API calls for it to communicate with the frontend.
| METHOD | URI | PARAM | DESC |
|---|---|---|---|
| GET | / | none | Request the frontend app |
| GET | /contacts | none | Request a list of contacts |
| GET | /contact/{id} | none | Request a particular contact record |
| POST | /contact | name, email, tel, address, photo | Create a new contact record |
| DELETE | /contact/{id} | none | Delete a particular contact record |
These routes will be defined in /Laravel/app/routes.php and their respective controller in /Laravel/app/controllers/ContactController.php.
routes.php looks something like this:
Route::get('/', "HomeController@index");

Route::get('contacts', "ContactController@contactList");

Route::get('contact/{id}', "ContactController@getContact");

Route::post('contact', "ContactController@newContact");

Route::delete('contact/{id}', "ContactController@delContact");
In ContactController@contactList, ContactController is the controller class name and contactList is the method to be called.
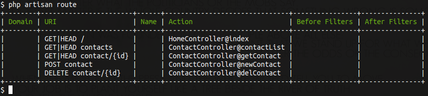
artisan provides a nice function to overview all routes defined in route.php. Try to run php artisan routes in your Laravel folder.
The database
Later I may introduce migration and seeder, which are convenient functions for creating and initializing database in Laravel, but for the time being just run this SQL command to create the table for our simple app.
CREATE TABLE contact (
  `name` VARCHAR(256),
  `email` VARCHAR(256),
  `tel` VARCHAR(256),
  `address` VARCHAR(256),
  `photo` VARCHAR(256)
);
The controller
In route.php, we have defined a set of routes and their respective controllers (HomeController and ContactController). Let’s start from the simplier one.
When a user access the document root, HomeController@index is triggered and index() in the following controller executes. It does nothing more than rendering a View, which is a HTML template called contact.php stored in app/views.
<?php

/* app/controller/HomeController.php */

class HomeController extends BaseController {

	public function index()
	{
		return View::make('contact');
	}
}
Our contact list application is very simple, so all API calls are initiated by the client that we treat as a black box for this tutorial. Like any other good programmer, encapsulation guarantees that we only need to care about the implementation of the APIs but not how they are called.
So here are them, the framework makes of database query stupidly simple. I am inclined to not explain them line by line because the class and method names should well represent their purposes.
<?php

/* app/controller/ContactController.php */

class ContactController extends BaseController {

    public function contactList()
    {
        $select = DB::table('contact')
            ->get();
        return Response::json($select, 200);
    }

    public function getContact($id)
    {
        $select = DB::table('contact')
            ->where('id', '=', $id)
            ->take(1)
            ->get();
        return Response::json($select[0], 200);
    }

    public function newContact()
    {
        $id = DB::table('contact')->insertGetId(
            [
                'name' => Input::get("name"),
                'email' => Input::get("email"),
                'tel' => Input::get("tel"),
                'address' => Input::get("address"),
                'photo' => Input::get("photo")
            ]
        );

        return Response::json(['id'=>$id], 200);
    }

    public function delContact($id)
    {
        $delete = DB::table('contact')
            ->where('id', '=', $id)
            ->delete();
        return Response::make("", 200);
    }

}
Although Model is out of the scope of this tutorial, you can achieve a pretty good abstraction by binding the entries of a database table to an object.
If you dig deeper into Laravel and have learned about Model, you would find that ContactController can get as simple as this:
<?php

/* a nicer version of app/controller/ContactController.php */

class ContactController extends BaseController {

    public function contactList()
    {
        $select = Contact::all();
        return Response::json($select, 200);
    }

    public function getContact($id)
    {
        $select = Contact::find($id);
        return Response::json($select, 200);
    }

    public function newContact()
    {
        $contact = Contact::create(
            [
                'name' => Input::get("name"),
                'email' => Input::get("email"),
                'tel' => Input::get("tel"),
                'address' => Input::get("address"),
                'photo' => Input::get("photo")
            ]
        );

        return Response::json($contact->id, 200);
    }

    public function delContact($id)
    {
        Contact::find($id)->delete();
        return Response::make("", 200);
    }

}
The view
This application has only 1 view, contact.php under app/views. It is the HTML template for the app yet this time it does not use any of the Laravel’s templating functionalities.
Conclusion
Even though I missed a couple of key features that make Laravel an enjoyment to use instead of a developer nightmare, but the aim of this tutorial is to get you started with Laravel. If you have tried other PHP frameworks before, congraduation, you will enjoy Laravel beacuse Laravel is highly automated and refined to make normal tasks such as database operations, input and output simple and easy.
Stay tuned to my blog as I may upload some more Laravel-related articles in the future!